Introduction
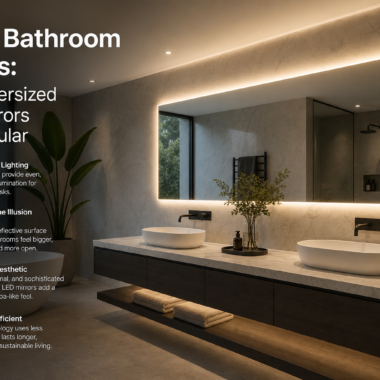
Old mirrors cluttering up your space might be more useful than you think. Instead of discarding them, you can give them a stylish new purpose by upcycling them into modern LED mirrors using DIY LED strips. This simple and budget-friendly DIY project allows you to transform outdated mirrors into functional pieces of art that brighten up any room. Not only is this an eco-friendly approach to home improvement, but it’s also a great way to add a touch of modern elegance to your space without breaking the bank.
In this guide, we’ll walk you through the process of converting old mirrors into LED mirrors, using affordable materials and simple steps. Whether you’re looking to upgrade your bathroom mirror or add some light to your living room, upcycling old mirrors with LED strips can give your home a chic, contemporary vibe.
Why Upcycle Old Mirrors with LED Strips?
Upcycling old mirrors is not only cost-effective, but it also provides several benefits:
Cost Savings: Buying a new LED mirror can be quite expensive, especially when you factor in installation costs. By using LED strips and an old mirror, you can save a significant amount of money while still achieving a modern look.
Customization: With DIY LED strips, you have the flexibility to customize the brightness, color, and placement of the lights to suit your needs. You can create a lighting setup that perfectly complements your space.
Sustainability: Upcycling helps reduce waste by giving an old item a new purpose. This eco-friendly project prevents mirrors from ending up in landfills and reduces the demand for new products.
Personal Satisfaction: There’s something incredibly rewarding about completing a DIY project and seeing the transformation firsthand. It’s an opportunity to showcase your creativity and enjoy the fruits of your labor.
Materials You’ll Need for the Project
Before starting the upcycling process, make sure you have the following materials on hand:
Old Mirror: Choose a mirror that you no longer use or one with a simple frame that you can easily modify.
LED Strip Lights: Purchase LED strips that fit the size of your mirror. LED strips come in various types, so make sure to select a waterproof or damp-rated option if you plan to use it in a bathroom or other moisture-prone area.
Power Supply: You’ll need a compatible power supply to run the LED strips. Ensure it matches the voltage and wattage requirements of the strips.
Double-Sided Tape or Adhesive Mounting Clips: These will help secure the LED strips around the mirror’s edge.
Wiring and Connectors: For connecting the LED strips to the power source, you may need some extra wiring and connectors.
Measuring Tape and Scissors: To measure the mirror and cut the LED strips to the desired length.
Optional: Mirror Frame (if desired): If you’re working with an older mirror with a worn frame, consider refreshing or upcycling the frame as well.
Step-by-Step Guide to Upcycling an Old Mirror into an LED Mirror
1. Prepare the Mirror and Space
Start by cleaning the old mirror thoroughly to remove dust, dirt, or grime. Use a glass cleaner and a soft cloth to ensure the surface is spotless. If your mirror has a frame that you’d like to update, now is the time to either paint it or refinish it.
Tip: If the frame is in good condition and you’re happy with its look, there’s no need to change it. Focus on adding the LED strips to enhance the mirror.
2. Measure and Cut the LED Strips
Measure the perimeter of your mirror to determine how much LED strip you’ll need. Once you have the correct measurement, cut the LED strips to size. Most LED strips come with designated cutting points, making it easy to trim them to the exact length you need.
Tip: If your LED strips are not pre-cut, take extra care while cutting to avoid damaging the lights or their connections. Use scissors designed for cutting electrical components to ensure a clean cut.
3. Attach the LED Strips to the Mirror
Carefully peel the adhesive backing off the LED strips and begin attaching them to the perimeter of your mirror. Start at one corner and slowly work your way around, pressing the strips firmly against the surface to ensure they adhere properly.
Tip: If your mirror is large, consider splitting the LED strips into smaller sections. This will make it easier to control the lights and ensure even coverage around the mirror.
For mirrors with a thicker frame, you can place the LED strips directly along the edges, while for thinner frames, you may want to place them slightly inward to keep the look sleek and polished.
4. Connect the LED Strips to the Power Supply
Once the LED strips are securely in place, connect the strips to the power supply. Make sure to follow the manufacturer’s instructions for proper wiring and ensure that the connections are tight and secure.
If you’re using a dimmable power supply, connect the dimmer control switch as per the instructions. This will allow you to adjust the brightness of your LED mirror based on your preferences.
5. Test the Lights
Before mounting the mirror back in its designated space, test the LED lights to ensure they’re working correctly. Turn them on and adjust the brightness or color if applicable. Make any necessary adjustments to the wiring if needed.
Tip: If you notice any flickering or uneven lighting, double-check the connections and ensure the LED strips are securely attached.
6. Mount the Mirror
Once you’re satisfied with the setup, mount the mirror back in its place. Depending on where you’re placing the mirror (e.g., bathroom, hallway), you can either hang it on the wall using appropriate wall anchors or place it on a stand.
For wall-mounted mirrors, make sure to use screws and anchors that are suitable for your wall type (drywall, concrete, etc.).
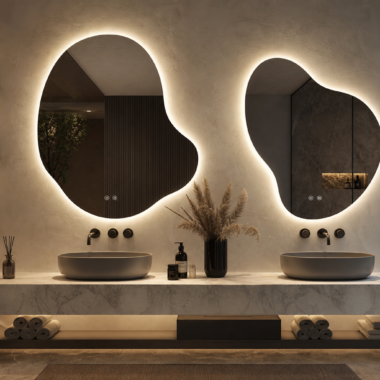
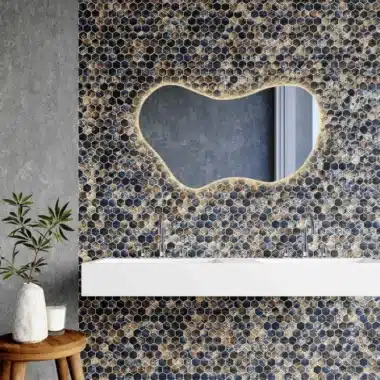
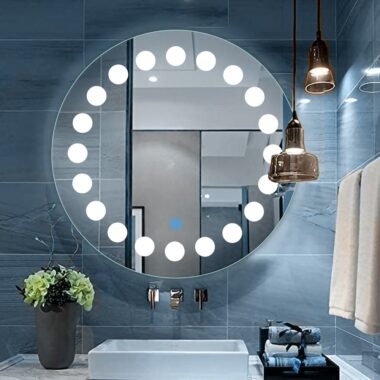
Creative Variations and Customizations
If you want to further personalize your upcycled LED mirror, consider the following customizations:
Add Color-Changing LEDs: You can install RGB LED strips to allow for color-changing effects. This is great for creating ambiance or matching the mirror’s lighting with different room themes.
Use Smart LED Strips: Upgrade your project by using smart LED strips that can be controlled via a smartphone or voice commands. This adds convenience and gives you more control over the lighting in your space.
Frame Refresh: Give your old mirror a brand-new look by adding a fresh coat of paint to the frame. Consider using metallic, rustic, or matte finishes to match your interior design style.
Dimmer Switch: If your LED strips don’t come with a dimmer option, consider adding one to give you more flexibility in controlling the light intensity.
Conclusion
Upcycling old mirrors into stylish LED mirrors is a fantastic way to refresh your space without spending a lot of money. By using affordable LED strips and simple DIY techniques, you can create a modern, functional, and aesthetically pleasing addition to any room in your home. Not only will you save money, but you’ll also be contributing to sustainability by reusing materials and reducing waste.
With a little creativity and effort, you can turn your old, unused mirrors into a beautiful focal point in your home. Whether you’re updating a bathroom mirror or creating a statement piece for your living room, DIY LED mirror upcycling is a rewarding project that adds both style and function to your living space.
FAQs
How much does it cost to convert an old mirror to an LED mirror?
The cost can vary depending on the size of the mirror and the type of LED strips you choose. On average, you can complete this project for around $30-$60, making it a budget-friendly option compared to buying a new LED mirror.
Can I use any LED strip for this project?
It’s best to choose a waterproof or damp-rated LED strip if you’re placing the mirror in a bathroom or another high-moisture area. Also, make sure the LED strip is compatible with the power supply you are using.
How do I make sure the LED strips stay attached to the mirror?
Use strong double-sided tape or adhesive clips to ensure the LED strips stay securely in place. Press the strips firmly against the surface and make sure the adhesive backing is properly applied.
Can I change the color of the LED lights in my upcycled mirror?
Yes! If you want to have color-changing lights, you can opt for RGB LED strips. These strips allow you to change the color of the lighting to suit your mood or match the decor.
Is it difficult to install the LED strips?
Installing LED strips is relatively simple and can be done by most DIYers. The adhesive backing on the LED strips makes them easy to apply, and the wiring is straightforward. However, it’s important to follow the instructions carefully for safe installation.
Can I use this technique for mirrors of any size?
Yes, you can upcycle mirrors of any size using this method. For larger mirrors, you may need additional LED strips, but the process remains the same.