Introduction
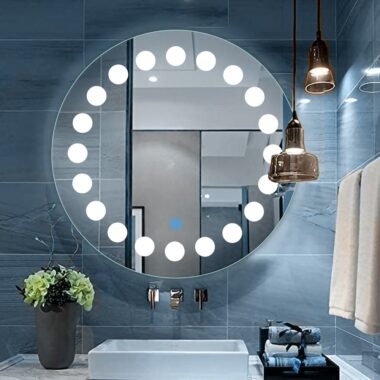
Installing an LED bathroom mirror is a great way to enhance both the functionality and aesthetics of your bathroom. Not only do these mirrors provide ample lighting for tasks like shaving or makeup application, but they also create a modern, spa-like ambiance. However, the installation process may seem intimidating for those who haven’t tackled a bathroom renovation project before. Fret not—this step-by-step guide will walk you through the entire process, from preparation to hanging your LED mirror with ease.
What You’ll Need to Install an LED Bathroom Mirror
Before diving into the installation process, it’s essential to gather the right tools and materials. Here’s a list of what you’ll need:
LED Bathroom Mirror: Ensure the mirror is suitable for your bathroom size and lighting preferences.
Measuring Tape: To mark precise measurements on the wall.
Drill: For making holes in the wall.
Screwdriver: For securing screws.
Screws & Wall Anchors: These will be used to attach the mirror to the wall.
Level: To ensure the mirror is perfectly aligned.
Stud Finder: For locating the studs in the wall to provide a secure mount.
Wire Cutters/Strippers: If wiring is required for an electrical connection.
Electrical Tape: For safety when working with electrical connections.
Power Drill (optional): To make the process quicker.
Safety Glasses & Gloves: For protection while drilling or handling tools.
Step 1: Prepare the Wall
The first step is preparing the wall for the installation of your LED mirror.
Choose the Right Location: Decide where you want to place the mirror. A common spot is above the bathroom vanity, ensuring the mirror is centered over the sink area.
Measure for Proper Height: Use a measuring tape to determine the appropriate height for your mirror. The average height for bathroom mirrors is about 5 to 6 feet from the floor, but this can vary depending on personal preference.
Check Wall Material: Determine whether your wall is drywall, tile, or wood. This will dictate the type of screws and anchors you use for installation of your LED mirror..
Use a Stud Finder: Use the stud finder to locate the studs in the wall. This will ensure that you are attaching the mirror to the most secure part of the wall, as studs can support more weight than drywall alone.
Step 2: Mark the Position of the Mirror
Position the Mirror: Hold the mirror up against the wall where you intend to install it. You may want a second person to help with this, as mirrors can be heavy.
Mark the Placement: Once the mirror is in position, use a pencil or marker to mark the top and sides of the mirror on the wall. This will guide you when placing the screws.
Ensure Proper Alignment: Double-check with a level to make sure the mirror is aligned correctly before proceeding.
Step 3: Install the Wall Bracket or Mounting Hardware
Attach Wall Brackets (if included): Most LED bathroom mirrors come with a bracket or mounting system for hanging. Follow the instructions provided with your mirror to install the wall brackets at the marked points.
Drill Holes for Wall Anchors: Using the drill, create holes in the wall where you’ve marked the positions for the screws. If your wall is drywall, use wall anchors to provide additional support.
Secure the Mounting Hardware: Insert the screws into the holes and attach the brackets or mounting plates securely.installation of your LED mirror.
Step 4: Electrical Connection (If Required)
If your LED mirror requires wiring for the built-in lights, follow these steps to safely connect the power:
Turn Off the Power: Before working with electrical wiring, turn off the power at the circuit breaker to ensure your safety.
Check for Existing Wiring: Some mirrors come with a power plug, while others need to be hardwired into the electrical system. If hardwiring, locate the nearest power source (either through an outlet or direct connection to the wall wiring).
Connect the Wiring: If you’re hardwiring the mirror, strip the wires, and connect them according to the manufacturer’s instructions. Typically, this involves connecting the live, neutral, and ground wires using wire nuts.
Secure the Wires: Use electrical tape to secure the wires in place, ensuring that there are no exposed connections that could cause electrical issues.
Step 5: Hang the LED Mirror
Once the wall brackets or mounting hardware are securely in place and the electrical connections are made:
Align the Mirror with the Brackets: With assistance, carefully lift the mirror onto the mounted brackets or hang the mirror according to the manufacturer’s instructions.
Check for Levelness: Use a level to ensure the mirror is hanging straight. Adjust if necessary before securing the mirror in place.
Secure the Mirror: Tighten any screws or fasteners that secure the mirror to the brackets or wall.
Step 6: Test the LED Lighting
Now that your mirror is securely installed, it’s time to test the LED lighting.
Turn On the Power: If your mirror is plugged into an outlet, turn the power on. If it’s hardwired, turn the breaker back on.
Test the Light: Check the LED lighting to ensure it’s working as expected. If the lighting is adjustable, play around with the settings for brightness or color temperature.
Check for Fogging: If your mirror comes with an anti-fog feature, test it by running hot water to see if the mirror stays clear.
Step 7: Final Touches
Secure Any Loose Wires: Ensure all wires are neatly tucked away behind the mirror or in the wall.
Clean the Mirror: Wipe down the mirror surface to remove any dust or marks left from installation.
Decorate Your Bathroom: Add any finishing touches to your bathroom to complement the new mirror, such as candles, plants, or decorative accessories.
Tips for Installing an LED Bathroom Mirror
Get Help: Mirrors can be heavy, so it’s a good idea to have a friend or family member assist with the installation.
Follow Manufacturer Instructions: Every mirror may have slightly different installation instructions, so always read the manual carefully.
Safety First: Always ensure the power is off when working with electrical components and use appropriate safety gear like gloves and glasses.
Conclusion
Installing an LED bathroom mirror may seem like a daunting task, but with the right tools and this step-by-step guide, you can easily add a touch of modern luxury to your bathroom. Whether you’re upgrading your existing mirror or installing a new one, a backlit LED mirror will not only enhance the aesthetics but also improve the functionality of your bathroom. Enjoy your new, spa-like bathroom with perfect lighting and a crystal-clear reflection every time you look in the mirror.
Suggestions for Inbound and Outbound Links:
Inbound Links:
Link to a related article on “Choosing the Right LED Mirror for Your Bathroom.”
Link to a page about “Modern Bathroom Lighting Ideas.”
Outbound Links:
Link to purchase LED mirrors from trusted retailers or manufacturers.
Link to a page on “DIY Electrical Work Safety Tips.”
Custom Message:
Write 100% Human Content that Ranks Higher: https://bypassgpt.ai/?ref=mts
Book a Consultation with me or hire me on Fiverr https://bit.ly/4bgdMGc
Would you like:
• A custom image for this article
• This article translated into another language
• A new article written on a related topic?